Sunday, December 7, 2014
Monday, December 1, 2014
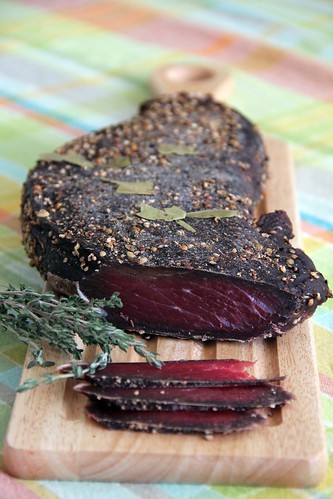
Meat, CURED BY ME!
I have always been under an impression that making a decent cured meat at home without having underground cellars or owning some kind of special equipment was impossible. Therefore, every time we visit Italy for vacation, we buy some (as much as the air luggage could care) pieces of cured meat and “prolong the taste of the vacation” for a few weeks at home. And then begins the long waiting period – until the next vacation. When I found this idea in a culinary magazine, I simply had to try it to see the results for myself. To make a long story short – the result is amazing. My guests couldn’t believe that this was home-made and not bought at some deli. And the fun part – the toughest thing here is to find enough space in the refrigerator…. So, anybody up for some cured meat?
Ingredients:
1 kg meat (*)
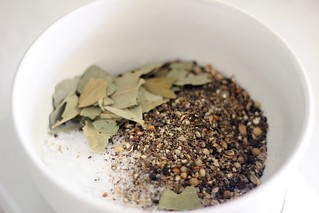
40 gr. sea salt
30 gr. sugar
4 gr. ground coffee
10 gr. black pepper, coarsely ground
10 gr. ground juniper berries (**)
5-6 bay leaves
40 gr. sea salt
30 gr. sugar
4 gr. ground coffee
10 gr. black pepper, coarsely ground
10 gr. ground juniper berries (**)
5-6 bay leaves
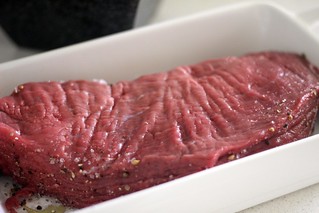
* It is recommended to use a long piece of topside beef
** In one case, I didn’t have either juniper or ground coffee at home (and it was weekend, so going to buy these was somewhat complicated), so I just used a spoonful of coriander seeds and a pepper mixture (English Pepper, White, Black and Green Peppers) instead. These are, by no means, equivalent, but the result turned out to be great as well – the cured meat ended up being more spicy.
Preparation:
1. Mix all the spices with salt and sugar, and then cover the meat with the mixture from all sides
2. Place the meat in some kind of a narrow “form” (not leaving any space on the sides), for example an English-cake baking form
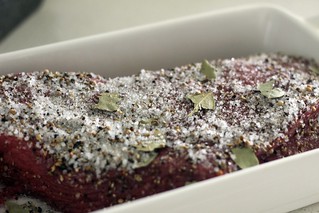
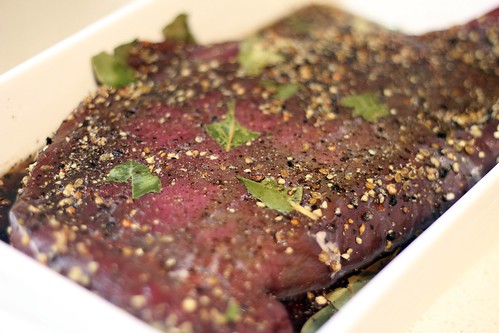
3. Wrap the form with the meat using a kitchen nylon wrap, put some sort of a narrow plate on top of it, to cover the upper surface of the wrapped meat and put some weight on top (some cans with preserved food, for example). Leave this “construction” in the refridgerator for 7-8 days. Every two days turn the meat upside-down and drain all the liquids from the form.
This is how it looked in my case after two days:
During these 8 days, the meat could loose between 10% and 30% of its weight. In my case, I’ve started with 1451 grams and ended up with 1293 grams. After the week, remove the meat from the form and dry it with paper towels. At this stage, you could also remove the spices from the exterior of the meat, as they’ve already served their main function. Leaving them can appeal visually and also add some extra spicy taste when eating. In my case I decided to leave them.
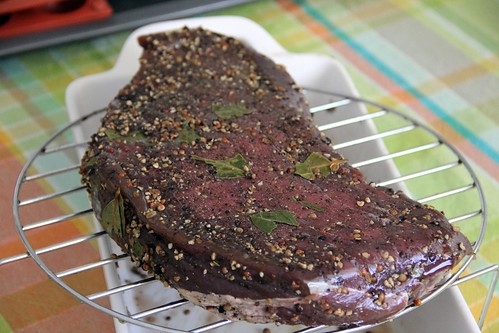
At this stage, if you have a huge refrigerator or a cellar with the right conditions, you are supposed to hang the meat on a rope. If all you have is a normal refrigerator (like me), then use the idea illustrated above (put the meat on some sort of a grill, on top of a deep plate or baking form, to allow air access to the surface. Leave the meat this way in the refrigerator (for drying and curing). Turn the meat over every couple of days and continue the process for 1 to 3 weeks. The above photo shows the way it looks after 1.5 weeks. After the whole process, the weight was 998 grams, so the eventual weight loss was 32%.
In the end of the process, keep the meat wrapped in a baking paper in a refrigerator. The meat should not be kept longer than a month.
Subscribe to:
Posts (Atom)